If you’re looking to install your new magicJack device at the mjreg.com website then this is just the guide for you. Though primarily focused around the magicJack Go this magicJack registry guide should work for all new magicJack devices!
Our Guide to magicJack Installation & Registration @ www.MJReg.com
magicJack GO Overview
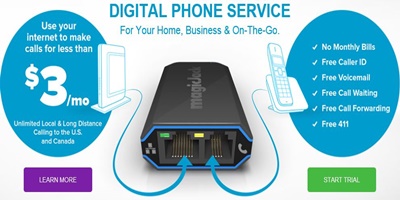
MagicJack Go is the latest and greatest VoIP home phone device from VocalTec, LTD. magicJack GO comes fully redesigned and looks great. In addition to its great new physical design it comes with a faster processor which means clearer calls and also comes in at a price of just $59.95 for the device and a full year of unlimited local and long distance calling. Future years of service can be had for just $35 each or $99.75 for 5 years. Recently magicJack has been running a special nearly all the time and offering the magicJack GO for just $35-$40 (over 40% off). Your purchase includes 12 months of free calling and free use of the magicApp (regularly $9.99).
Contents of the GO Package
- magicJackGO
- Power adapter
- Ethernet cable
- USB extension cable
- Step-by-step instructions
MJREG.com Install Overview
With the introduction of the new magicjack installation application many of the magicJack registration problems have been eliminated and you now have two ways to register and get your magicJack Go device operational. You can avoid hooking your device to your computer and quickly use the www.mjreg.com website or you can hook the device into your USB drive on your computer and use the software application. We suggest the MJREG website process if you want to avoid installing the magicJack software on your computer. This also allows you to get the device all setup for use without a computer and simply visiting the mjreg site to finish installation and registration. For use with a computer you will have to use the software application for installation.
The GO devices’ installation is quick, simple and easy and eliminates most of the magicJack installation problems that people faced in the past. Anyone with basic computer understanding and a high speed Internet connection can get it going. In the past consumers have had many problems with older versions of magicJack and their setup processes, but most these complications had been eliminated with the MJREG registration site and now magicJack has taken things a step further with a quick install process for those that can’t navigate the new registration site.

Image 2: How to Hook Up Your magicjack Go
Preferred MJREG Activation Method Without A Computer
1) The first step is to hook up your magicJack to the Ethernet cable into the “Internet” port on the magicJack Go. When doing this please be sure you hear the ‘click’ before moving to step 2.
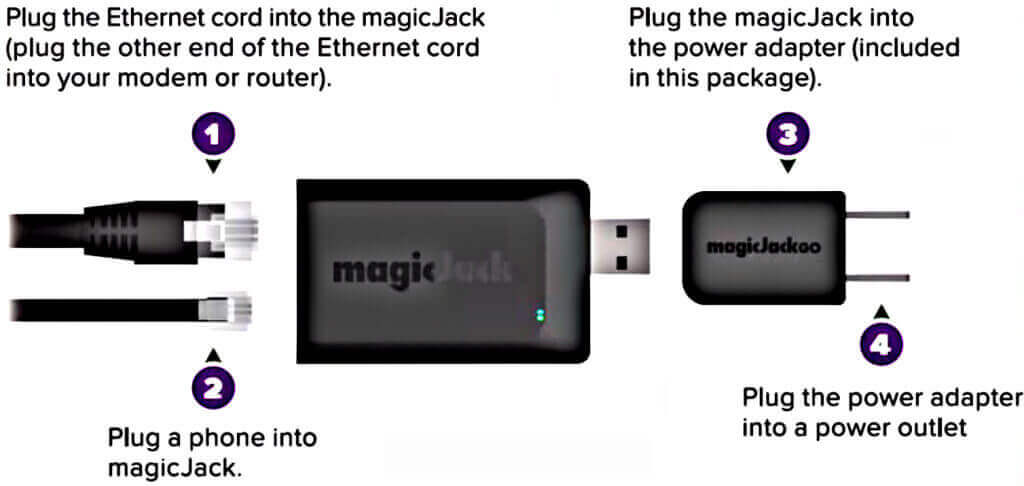
Image 3: magicJack GO A Steps Without A Computer
2) The second step is to plug the other end of the Ethernet cable into your modem or router. Most routers have multiple Ethernet ports and you can choose whichever one you like. Again please be sure that you hear the ‘click’ again or your device won’t end up setup correctly.
3) The third step is to plug the RJ phone jack cable into the “Phone” port on the magicJack Go. Again plug it in until you hear the click. Also make sure the other end is connected to the home phone you want to use.
4) The next step is to plug the magicJack Go into the included power adapter directly or using the USB extension cable.
5) The fifth step is to plug the power adapter into any plug or outlet
6) The sixth and final step is to open up any browser on your computer (MAC or PC), tablet or smartphone and visit the magicJack registry site at www.mjreg.com and follow the prompts. (During this process the computer, tablet or smartphone you use must be on the same internet network as your magicJack GO device.) Here you can transfer your old devices account or start a new account. The steps for the registration site are fairly simple and straightforward but I haven’t included them because I didn’t install my device this way.
*Some people will have issues with getting the MJREG site to recognize their GO device. Those individuals will have to follow the alternative install guide below by using the USB drive on their computer.
Alternative Installation Method Using a Computer
1) First plug your magicJack device into any USB drive on your computer.
2) You should see a driver installation dialog box in the lower right of your screen – we can safely ignore this as it’s an automatic install of software.
3) You will see an auto-play dialog box with a button “Start magicJack” – go ahead and click that button to get the installation process started.
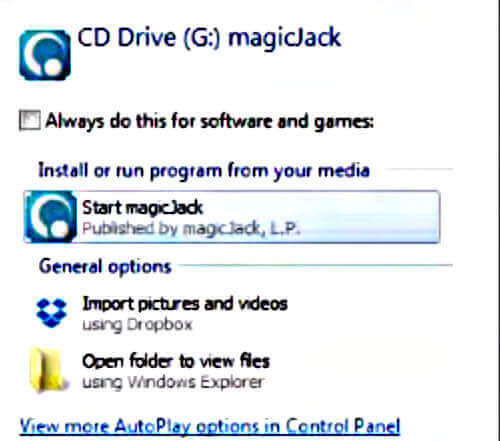
Image 4: Auto-Play Dialog Box
4) The magicJack logo will show up on your screen – it may take a several minutes to load the application from here.
5) The MJREG software application icon will install on your desktop and will open automatically.

Image 5: magicJack Software Application
6) The magicjack software interface should appear with a dial pad and various changing text – once the dial pad appears we will begin the registration of your device.

7) Look in the lower pane of the magicJack software application window for both a blue and purple area. The blue area (on the left side) offers you 30 minutes or 48 hours (whichever comes first) of outgoing calls to test the device.
Image 6: Lower pane of magicJack software application
8) The purple area is to go ahead and register your device right away and get a phone number. Click the purple area that says “Or click here to register now and get a phone number”.
9) A page will load within the software application with an offer to start a new account or use your magicJack login to get access to and combine your existing account. If you have an existing account it is likely you will want to proceed with the magicJack login option but for today I’m going to stick with the process for new users that don’t have a magicJack login yet. To start your new magicJack VoIP account click the “create my account” button.

Image 7: Create Your Account
10) The window will load a new page. Once there fill out your name, address, email and select a password. Make sure that it shows in the right hand corner of this page “device detected” with a green check mark and a picture of the magicJack GO. If not then something is wrong and the program shouldn’t let you proceed. Once finished filling this page out click the “create my account” button again and you will be brought to the next page.
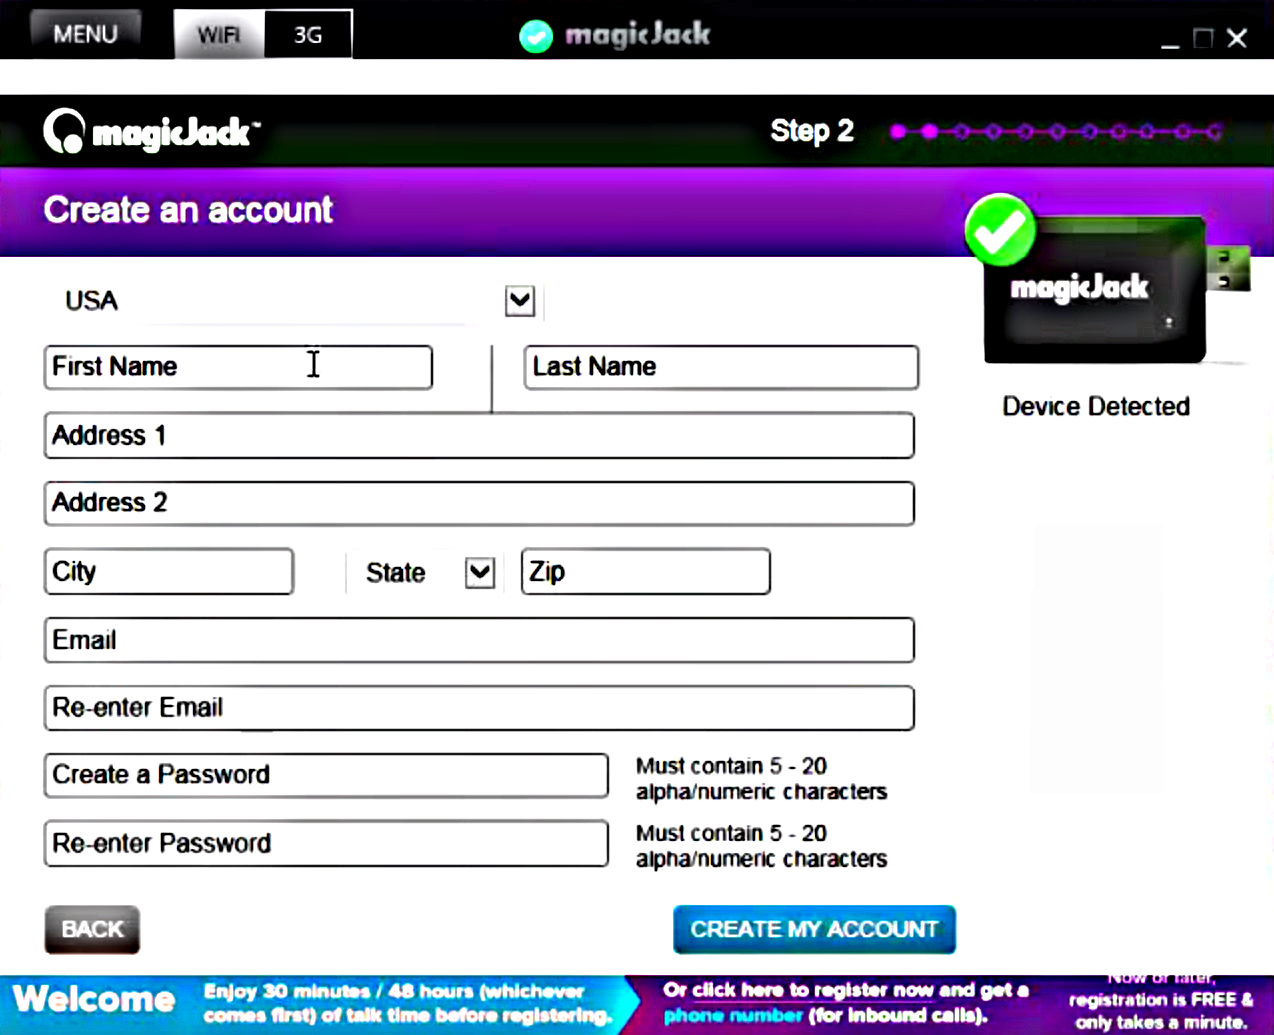
Image 8: Enter Your Details
11) On the next page you will name your device. This is of very little importance and can be anything that you would like as only you will see it. Once you have typed in your selected name click “Send my code” and magicJack will send an activation code to your email address.

Image 9: Name Your Device
12) Check your email for the code (The email make take several minutes to come). Take the code and type or copy/paste it into the box on new screen that loaded in the magicJack interface. After that click the “Activate my device” button and magicJack terms of service will be uploaded on a new page within the software.

Image 10: Enter Your Activation Code
13) After reading the USA terms or Canadian terms (this is very important as magicjack has some funky terms and conditions that limit your calls to certain numbers) click the “I Agree” box and then click the “Continue” button and you will move on to the next screen.

Image 11: Accept The magicJack Terms of Service To Continue
14) At the next screen a popup will show up telling you that you have a $10 credit in “magicDollars” which can be used for a specific period of time for anything from international calling credit, porting your old number or selecting a custom phone number (if you want a specific area code check the magicJack area codes table I provide here). You can safely ignore and X out this popup for now as the credit can be used later. However if you want to port your number use the credit now by all means!

Image 12: Free magicDollars!!!
After X’ing the magicDollars options you have several other options on this screen for choosing your number – you can either select a FREE US Number or pay $10 for either a Canadian number, U.S. Vanity Number or to port your old number. There was also a free option for choosing a magicNumber but this was unclear to me and I am not exactly sure what it was for. Go ahead and choose the free magicJack number. After this choose your state, area code, and first four digits of your phone number. The key here is that you’re not restricted to the actual area where you live. If you live far away from most of your family and friends you can select a number back home and then your family can call you from across the country while avoiding long distance calling rates. You can select any phone number, with any area code and any first four digits that magicJack has available. The area code does have to match with the state that you pick of course. Once done with this click “Add To Cart To Continue” and you’ll move on to the next page.

Image 13: Select Your Number
15) The next page is simply where you enter your 911 address. You can select from the drop down menu and the address you entered when first registering should appear as the only option. Select it if that’s where you are going to be using the magicJack GO device or you can add a new address if you will be using it somewhere else. If you are outside the U.S. no 911 services are offered and you will need to select that option. Once done with that click “Confirm” and you’ll get a confirmation screen to confirm that your address is indeed correct. Select “Yes” if it’s correct and then click “Submit” to move on to the next screen.
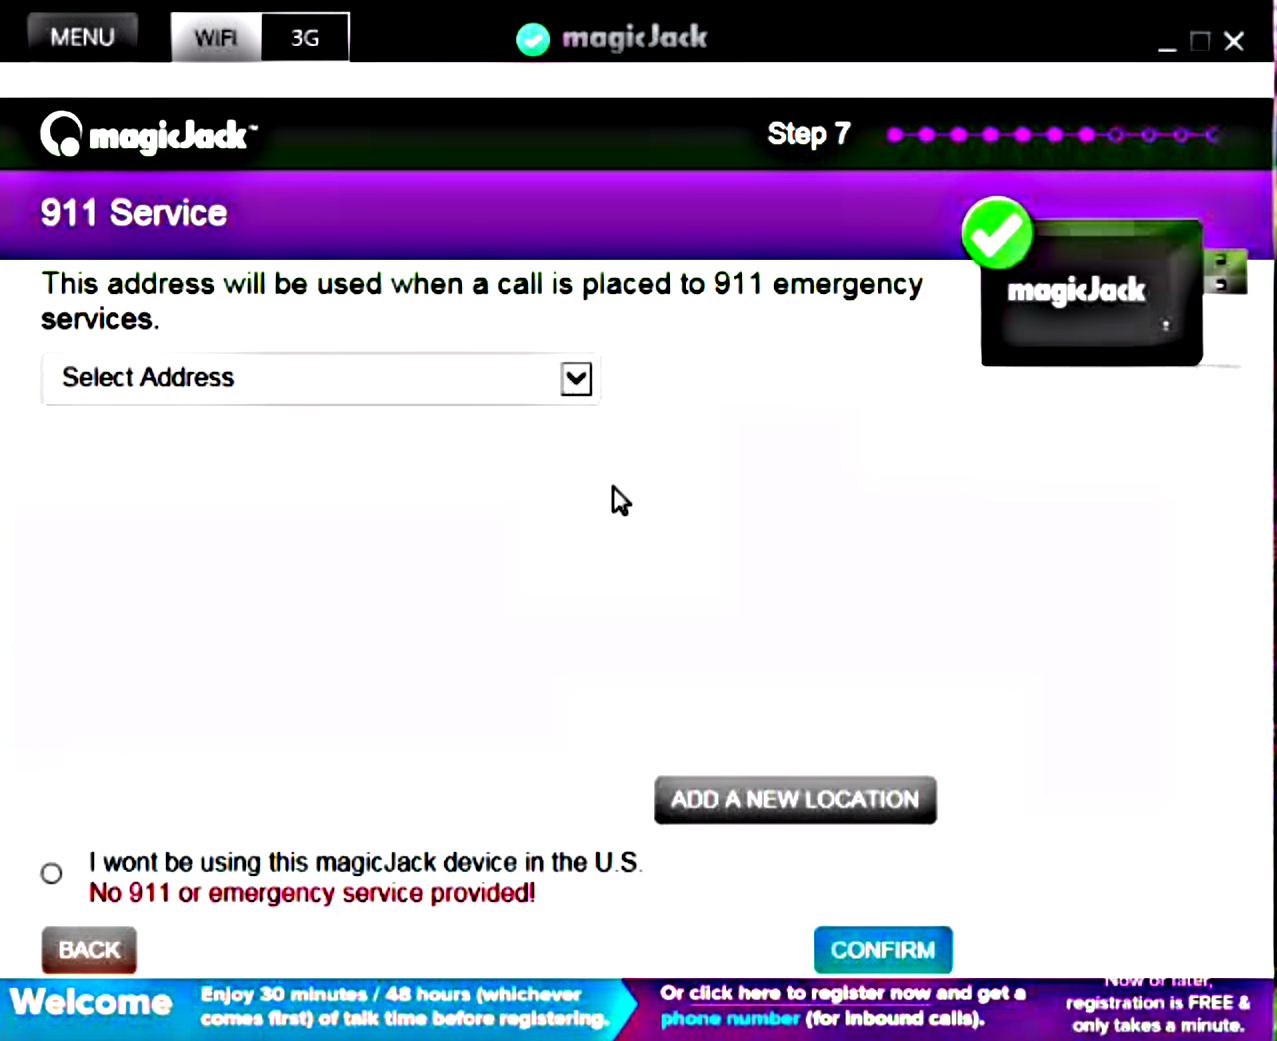
Image 14: Select Your 911 Address
16) On the next screen you have the option to chose your magicJack service plan, but this isn’t recommend now as the magicJack GO already comes with a full year of free service and you aren’t offered any special rates to tack on extra service. You can select to extend for 1 year for $35, 5 years for $120 or set it to auto-new yearly. I highly suggest clicking “Skip For Now” and moving on. You can always add service extensions in the future once you are happy with the device and know you want to keep it for the long term.

Image 15: Choose Your Plan
17) The next screen provides options for adding international minutes credit which again, can be done anytime. I also suggest skipping this and adding credit if you need to make international calls once you are happy with the device. magicJack does offer super cheap international rates to hundreds of countries so this could be very useful down the line if you have friends/family overseas. Add minutes or again click the “Skip For Now” button to move on.
18) The next screen provides you a chance to review your order and shows everything that you will be getting. The total should be $0 if you didn’t add any extras to your account; such as porting your number or international credits. The things that should show up in your account are MJ 911 Service Plan, $10.00 in magicDollars, magicJackGo Standard Dialing Plan and U.S Phone Number – Free. Once finished reviewing everything click “Place Order” to move on.

Image 16: Review Your Order
19) On this final screen you are shown your phone number and several options to proceed. Make sure to jot down your new number so that you don’t forget it. Then you can click “Close Window And Start Making Calls Immediately With Your PC” or if you are like most people and are planning to use your magicJackGO home phone service without your computer you need to click the button “Click To Exit Application And Use Without Your PC”.

Image 17: Your Order Is Complete
20) The application will return to the original dialpad screen that you saw when first starting but will show your address in the window pane below the dialpad. There will also be an option for voicemail now to the right of this address. The address area is important because there a tiny 911 symbol that will be yellow when you first register. Yellow means that the address hasn’t been verified and this can take several days to a week for magicJack to verify you address. If the symbol is black it means the address in not within the U.S. and therefore no 911 services are available. If it is red that means that magicJack has been unable to verify your device. In this case you should contact their customer service. Finally, if it is green then your 911 address has been fully verified and magicJack 911 services are working.
21) At this point you need to remove the magicJack GO from your computers USB port and wait a few minutes for the software application to recognize that you have removed the device. Once it catches up to speed a white box will popup that says you need to insert your magicJack device to make calls. We will X this box and move on to setup magicJack GO to be used without a computer.
Final Steps for Setup and Use
Now that we are done with registration of the magicJack GO device using the installation software we need to get it running without the need for our computer. This is pretty simple and requires only a handful of steps.
1) Firstly, connect your magicJack Go to the power adapter using its USB port and USB cable.
2) Secondly, connect your internet modem or router to the magicJack Go device using the provided Ethernet cable, by plugging in each end of the cable to the Ethernet ports on both the devices.
3) Plug in the desired telephone to the magicJack GO device via the RJ11 phone jack port.
4) Plug in the power adapter to a power source
5) Make sure that the blue light is solid and the white light is blinking.
6) Your hardware is ready to receive and make calls over internet.
You are now done and ready with a fully functioning magicJack GO. This may seem like a lot of steps but this is an over detailed guide to activate and register your device. The process is really super quick! I did it in under 10 minutes and you should be able to too as I’m no expert.
Your Free $10 In magicDollars
One last note about the $10 in magicDollars, from what I’ve read and seen online from videos it appears that the credit doesn’t show as a credit in your account when you login to your magicJack account but it is indeed there. Chris from “Laughter On Water” did a wonderful magicJack GO install video and at the end goes into detail about the $10 magicDollars after chatting with a support agent. The agent told him that once you go in to your account and add a service that costs money the $10 will be deducted during checkout. Thanks for the tip Chris!
magicJack Plus 2014 Details
The new and improved 2014 magicJack Plus is the latest in the series of market leading internet calling devices available with a favorable price tag. Retaining the best features of its award-winning predecessor, magicJack plus, released in 2011-12, it steps up the game with better installation options and a wider array of features.
MJ Plus 2014 Device Upgrades
The device itself, adds slightly to its weight and size, thanks to two USB ports and an additional SDIO interface to the side. These add to the existing Ethernet ports for phone and internet. Power adapter, Ethernet cable and USB extension cord round off the package. Functionality of the extra USB port and SDIO slot are still a mystery and the company has yet to announce plans for these extra features. One can only guess that the company plans a firmware upgrade to make these functional once they work out all of the details.
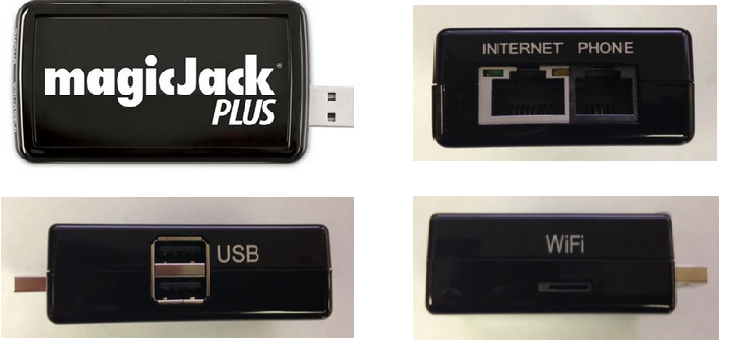
Image 1: The new Plus 2014 has additional USB ports and SDIO port
magicJack Plus 2014 mjreg Installation Summary
The installation procedure for Plus 2014 delivers on its pre-release buzz of making the computer redundant. Happily for the existing users, it still retains the necessary features for traditional three-step installation using a computer.
In the past installation, registration and activation was quite complex and caused people many issues. Included with the new device is an all-new web based install method. Simply use their MJREG site and follow all the prompts (as shown below) and you will have your device up and running in no time. This includes installation and activation of the device and setup of your new magicJack account.
Installation Steps & Use With A Computer
- Connect your MagicJack Plus 2014 to the computer using USB port and the Phone to other end of the MagicJack device using the Ethernet cable.
- For a windows device (PC, windows tablet), the MagicJack Plus software loads automatically. For MAC or iOS devices (iPhone, iPad), you will need to double click the Plus icon which will begin the installation.

Image 2: The new Plus 2014 setup with a computer
- If you’re a new user, click the blue button marked “Click Here Now” (under the text “To complete Registration”) in the left window of the installation screen and follow along the steps to register with your personal information (Image 3). You will get options to select a number of your choice during this process.

Image 3: The new MagicJack Plus 2014 app registration
- As a handy alternative, you can also download the magicJack app (called magic App) from Apple app-store or play-store and install on your mobile/tablet device. Once you select the relevant option (refer: Image 4) and finish installation, you’re ready to make calls using your device.
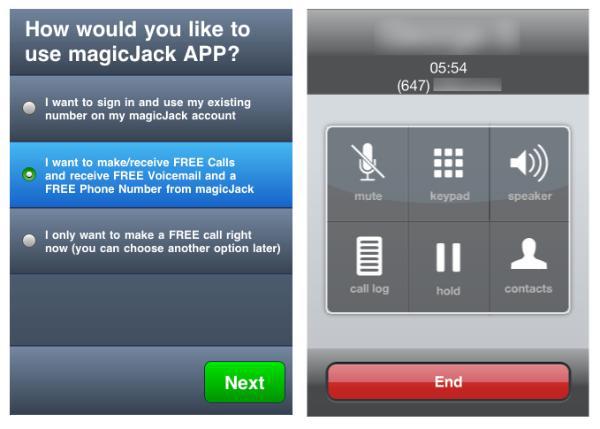
Image 4: The new Plus 2014 app installation
- The problem with this method is that you have to keep your laptop or computer ON as the primary device for the connection as long you are wanting to make or receive any calls. Tablets or Smartphones may also be used as internet devices.
Typically, for calls of longer duration, this could hinder the experience, as the computer may drift off to ‘power-saving’ or ‘hibernate’ mode, causing potential interruptions in service. Additionally, it also means there’d be higher power consumption as both internet modem and computer would need to be powered on for the duration of the call. While the benefits of making unlimited calls all over the Internet usually outweighs these problems, the option of being able to use the new device without the computer certainly means one less operational layer and better continuity in calls.
Do remember that even if you plan to use the device without a computer, you will need to connect to the computer once to register (if you’re a first time user) or transfer service (if you’re an existing user). The instructions to do so, including the information regarding registration, are available at the back of the device.
Installation Steps & Use Without A Computer
- Connect your device to the power adapter using USB port.
- Connect the internet modem or router to the device using the Ethernet cable, plugging in each end of the cable to the Ethernet ports on the devices.
- Plug in the desired telephone to the device.
- Plug in the power adapter to a power source and your hardware is ready to receive and make calls over internet.
- Open up your web browser and visit the mj register site at www.mjreg.com on your laptop, computer, tablet or smartphone. You can transfer service from an old device, or upgrade an existing account to add the Plus 2014, besides creating a brand new mj registration. To upgrade an existing account you will need to login to that existing magicJack account.
- The activation code is sent to you via an email when going through the steps at the MJ reg site. Do remember that the area code for location may not be available for your desired MJ number.
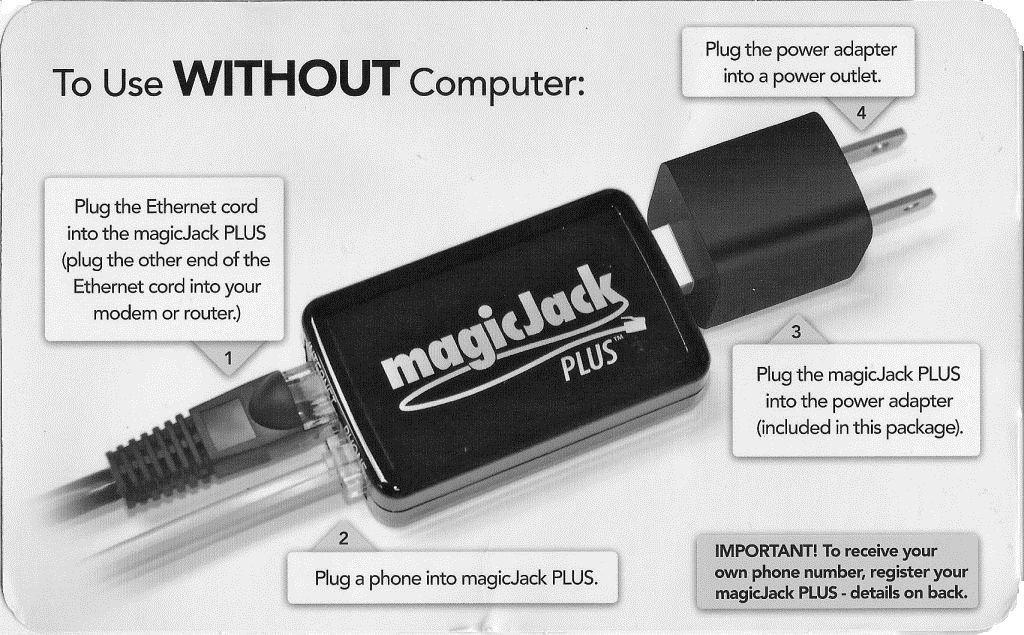
Image 5: The new MagicJack Plus 2014 set up without a computer
Tips To Remember During magicJack Setup on MJREG.com
- During the registration process, the computer, tablet or smartphone used for registration must be on the same network as the Plus 2014 device.
- One of the frequent customer complaints involves Error code 3002, which pertains to multiple device connectivity permissions for the modem. Before you invest in MagicJack, call your internet service provider (ISP) and ensure that your modem allows more than one device to access internet through it. Another option is to connect your device directly to one of the Ethernet ports of the router.
- If you own multiple devices and plan to ‘upgrade’ or transfer service, be advised that the process usually de-activates the older device and robs you of any left-over subscription time you might have accrued on the old device. Thus it may be prudent to create a new account instead.
- Support for the Windows 8 operating system is flaky. Unfortunately, the online support isn’t great either. Drivers developed by independent developers, downloadable at websites like this, come to rescue.
On the whole, the new Plus 2014 shows a marked improvement in flexibility of installation and device activation options with the ability to use the MJReg site. While for an existing user, it might be worth waiting until the WiFi options are fully active; for the new users, it provides an attractive combination of features, better device connectivity options and a friendly price-tag.
Advanced Installation Help
Outside of our advanced guide above, the box comes with an installation manual as well as video guidelines on YouTube.